RabbitMQ Publish/Subscribe
Publish/Subscribe (using the Java Client)
- 여러 Consumer에게 메세지를 전달하는 방법을 소개한다
- 이러한 패턴을 Publish/Subscribe라고 한다
- 로깅시스템을 예로 들어서 소개 할 것이다
- Publishing된 로그 메세지는 모든 Receiver(Consumer)에게 전달된다
Exchanges
- “Hello World”와 “Work Queues”에서는 Queue에 직접 데이터를 Publishing하는 것 처럼 보였다
- 실제 RabbitMQ는 Queue에 직접적으로 데이터를 넣지 않는다
- Producer는 메세지를 오직 exchange에게만 전송할 수 있다
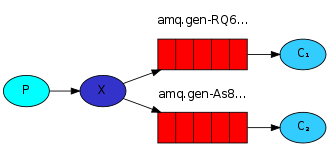
- exchange의 한쪽에서는 Producer로 부터 메세지를 수신하고 다른 한쪽에서는 Queue로 메세지를 전달한다
- exchange는 메세지를 어떠한 Queue에 넣어야 할지, 모든 Queue에 넣어야할지, 버려야할지 알고있어야 한다
- exhcange는 “X”로 표시한다

- 4가지 Exchage Type이 있다
- direct
- topic
- headeers
- fanout
- 모든 Queue로 메세지를 전달한다
-
fanout 타입을 갖고 logs라는 이름의 exchange를 생성하기 위해 다음과 같이 한다
channel.exchangeDeclare("logs", "fanout"); -
logs라는 exchange로 메세지를 보내기 위해 다음과 같이 한다
channel.basicPublish("logs", "", null, message.getBytes());
Listing exchanges
-
아래 명령을 실행하면 exchange 리스트를 볼 수 있다
$ ./rabbitmqctl list_exchanges Listing exchanges ... direct amq.direct direct amq.fanout fanout amq.headers headers amq.match headers amq.rabbitmq.log topic amq.rabbitmq.trace topic amq.topic topic logs fanout ...done. -
exchange 리스트 중 amp.* 형태로 되어있는 것들은 기본으로 생성된다
- amp.* 형태의 리스트들을 아마 사용할일이 없을 것이다..
Nameless exchange
- “Hello World”와 “Work Queues”에서는 exchange이름을 지정하지 않았다
-
exchange 자리에 ”“(Empty String)를 넣었었다
channel.basicPublish("", "hello", null, message.getBytes());- 첫 번째 파라미터에 exchange의 이름을 넣어야 하지만 빈 값을 넣었다
- 빈 값은 기본 exchage를 사용하도록되어 있다
- routingKey를 이용하면 특정한 Queue에만 메세지를 전달 할 수 있다
Temporary queues
- 임시 Queue를 생성하기 위해서는 2가지 방법이 있다
- RabbitMQ에 연결을 할때마다 임의의 이름을 가진 Queue를 생성하는 방법
- Queue를 생성 후 Consumer들이 Queue에서 모두 연결이 끊기면 자동적으로 Queue를 삭제하는 방법
-
아무런 파라미터 없이 queueDeclare()를 호출하면 non-durable, exclusive, autodelete 속성을 갖는 임의의 Queue가 생성된다
String queueName = channel.queueDeclare().getQueue();- Queue이름은 amq.gen-JzTY20BRgKO-HjmUJj0wLg 이러한 형태가 된다
Bindings

- exchange와 Queue를 생성한 후 exchange가 Queue에게 메세지를 전송할 수 있도록 두개 사이의 관계를 생성해야한다
- Binding한다고 부른다
-
logs라는 exchange에 Binding 하기 위해 다음과 같이 한다
channel.queueBind(queueName, "logs", "");
Putting it all together

EmitLog.java (Sending)
import java.io.IOException;
import com.rabbitmq.client.ConnectionFactory;
import com.rabbitmq.client.Connection;
import com.rabbitmq.client.Channel;

public class EmitLog {

	private static final String EXCHANGE_NAME = "logs";

	public static void main(String[] argv) throws java.io.IOException {

		ConnectionFactory factory = new ConnectionFactory();
		factory.setHost("localhost");
		Connection connection = factory.newConnection();
		Channel channel = connection.createChannel();

		channel.exchangeDeclare(EXCHANGE_NAME, "fanout");

		String message = getMessage(argv);

		channel.basicPublish(EXCHANGE_NAME, "", null, message.getBytes());
		System.out.println(" [x] Sent '" + message + "'");

		channel.close();
		connection.close();
	}
	//...
}
ReceiveLogs.java (Receiving)
import com.rabbitmq.client.*;
import java.io.IOException;

public class ReceiveLogs {
	private static final String EXCHANGE_NAME = "logs";

	public static void main(String[] argv) throws Exception {

		ConnectionFactory factory = new ConnectionFactory();
		factory.setHost("localhost");
		Connection connection = factory.newConnection();
		Channel channel = connection.createChannel();

		channel.exchangeDeclare(EXCHANGE_NAME, "fanout");
		String queueName = channel.queueDeclare().getQueue();
		channel.queueBind(queueName, EXCHANGE_NAME, "");

		System.out.println(" [*] Waiting for messages. To exit press CTRL+C");

		Consumer consumer = new DefaultConsumer(channel) {
			@Override
			public void handleDelivery(String consumerTag,
			                           Envelope envelope,
			                           AMQP.BasicProperties properties,
			                           byte[] body) throws IOException {
				String message = new String(body, "UTF-8");
				System.out.println(" [x] Received '" + message + "'");
			}
		};

		channel.basicConsume(queueName, true, consumer);
	}
}
원문
- http://next.rabbitmq.com/tutorials/tutorial-three-java.html
Published 09 April 2016